
For Confirming Entity
This is an operation manual for confirmation respondent users.
- Please also refer to "Balance Gateway Quick Reference Guide (For Confirming Entity)" where specific operational points of Balance Gateway are described using accompanying images.
Table of Contents
- 1. OPERATING PROCEDURES
- 2. OTHER OPERATIONS
- VIEW CONFIRMATION RESPONSE AFTER REPLYING TO CONFIRMATION REQUEST AND APPROVING CONFIRMATION RESPONSE
- WHEN THE CONFIRMATION REQUEST IS OVERDUE/NOT RESPONDED IN TIME
- IF YOU ARE ASKED FOR RE-CONFIRMATION
- FORCED COMPLETION OF CONFIRMATION LETTER BY AUDITOR
- ADD, EDIT, OR DELETE RESPONDING USERS
- EDIT YOUR USER INFORMATION
- IF YOU FORGOT YOUR PASSWORD
- IF YOUR ACCOUNT IS LOCKED
- REFERENCE INFORMATION
- CONTACT INFORMATION
Copyright © Audit Confirmation Center GK All rights reserved.
Table of Contents
- 1. OPERATING PROCEDURES
- RECEIVE USER REGISTRATION EMAIL AND INITIAL AUTHENTICATION CODE
- LOGIN
- INITIAL AUTHENTICATION
- REPLY TO CONFIRMATION REQUEST
- How to enter the response: Checkmark form
- How to enter the response: Input form
- How to enter the response: Reference attachment form
- APPLYING THE RESPONSE APPROVAL (GENERAL USER)
- APPROVING RESPONSES (ADMINISTRATOR USER)
- REJECT REQUEST
- REQUEST FOR ANOTHER RESPONSE FROM AUDITOR
- 2. OTHER OPERATIONS
- VIEW CONFIRMATION RESPONSE AFTER REPLYING TO CONFIRMATION REQUEST AND APPROVING CONFIRMATION RESPONSE
- WHEN THE CONFIRMATION REQUEST IS OVERDUE/NOT RESPONDED IN TIME
- IF YOU ARE ASKED FOR RE-CONFIRMATION
- FORCED COMPLETION OF CONFIRMATION LETTER BY AUDITOR
- ADD, EDIT, OR DELETE RESPONDING USERS
- EDIT YOUR USER INFORMATION
- IF YOU FORGOT YOUR PASSWORD
- IF YOUR ACCOUNT IS LOCKED
- REFERENCE INFORMATION
- BALANCE GATEWAY SCREEN
- USER ROLES AND AUTHORITIES
- RELEASE NOTES
- Ver. 8.2.00
- Ver. 8.1.00
- Ver. 8.0.00
- Ver. 7.0.00
- Ver. 6.0.00
- CONTACT INFORMATION
1. OPERATING PROCEDURES
- Home
- 1. OPERATING PROCEDURES
- RECEIVE USER REGISTRATION EMAIL AND INITIAL AUTHENTICATION CODE
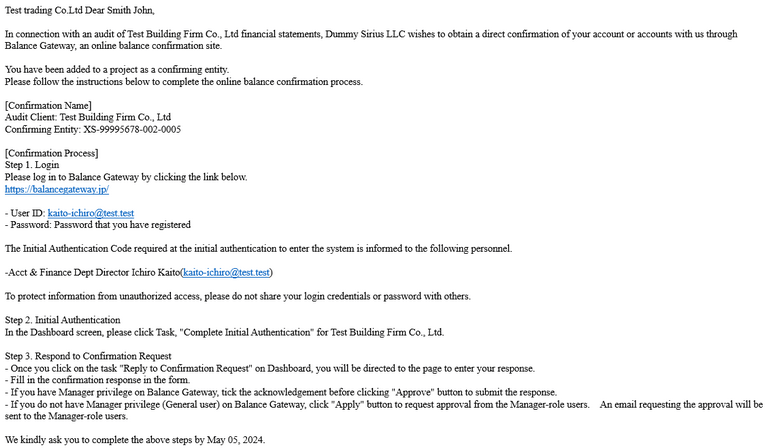
RECEIVE USER REGISTRATION EMAIL AND INITIAL AUTHENTICATION CODE
If the auditor requests a response, the following e-mail is sent to the confirmation respondent users (you).
- Registration notification email to use the system (to Managers and General Users)
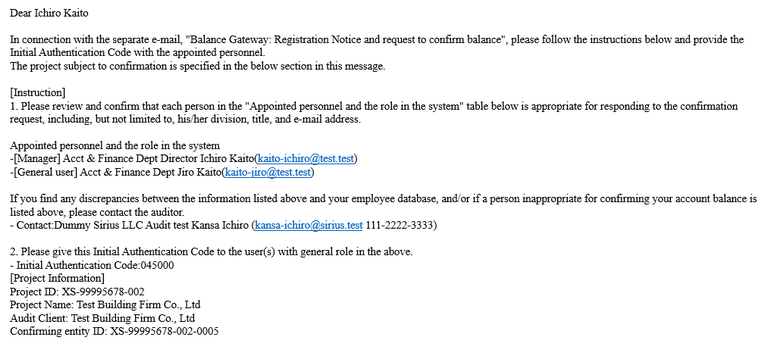
- Initial Authentication Code notification email (to Managers only)
Please proceed to the next step “LOGIN” when you receive the emails above.
E-mail sample
Registration notification Email
Email title
Balance Gateway: Registration notice and request to confirm balance
Initial Authentication Code notification email
Email title
Balance Gateway: Registration Notice and request to confirm balance (Initial Authentication Code)
Next process
- Home
- 1. OPERATING PROCEDURES
- LOGIN
LOGIN
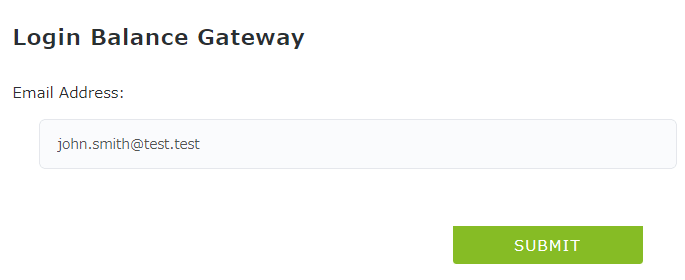
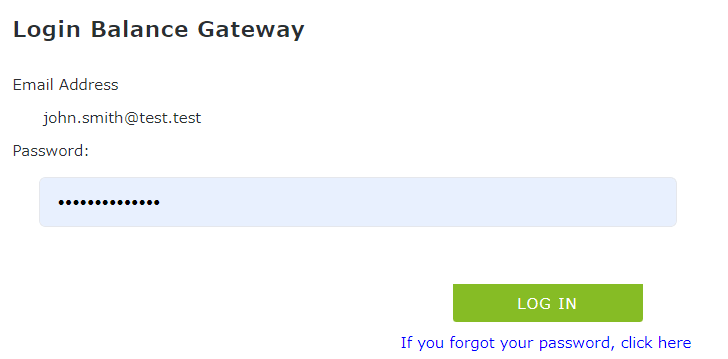
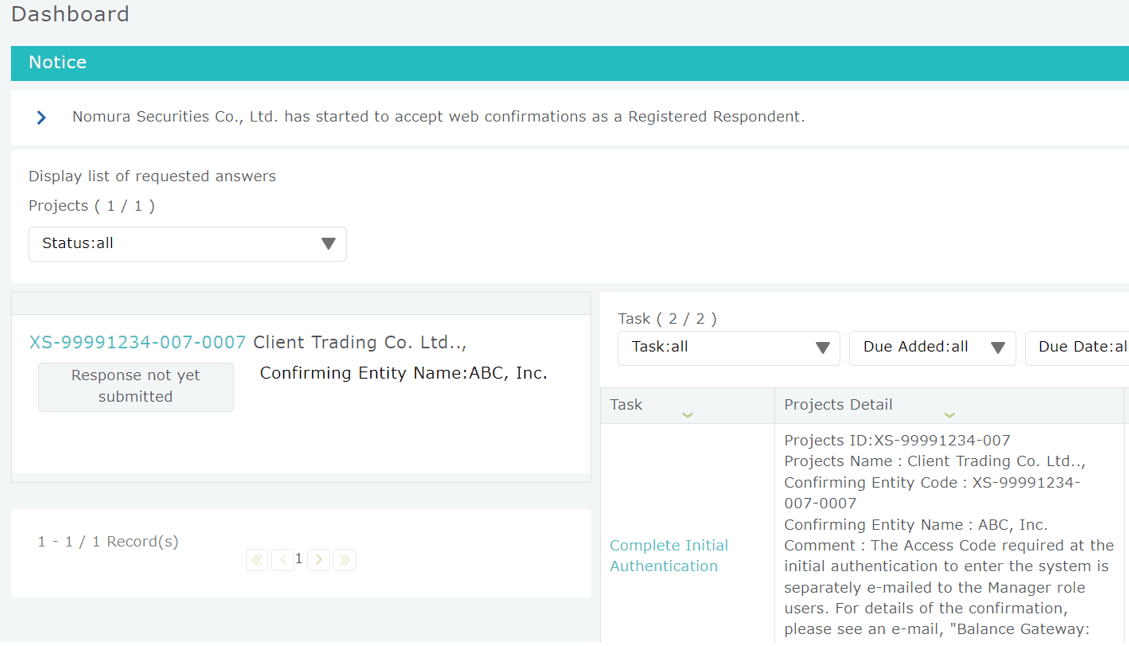
Click the URL described in the registration notification email, as mentioned in “RECEIVE USER REGISTRATION EMAIL AND INITIAL AUTHENTICATION CODE”, to display the [Login Balance Gateway] screen. Please enter your email address and click [SUBMIT] button, then enter the temporary password, which also is described in the email.
When the login is completed, the Dashboard screen is displayed.
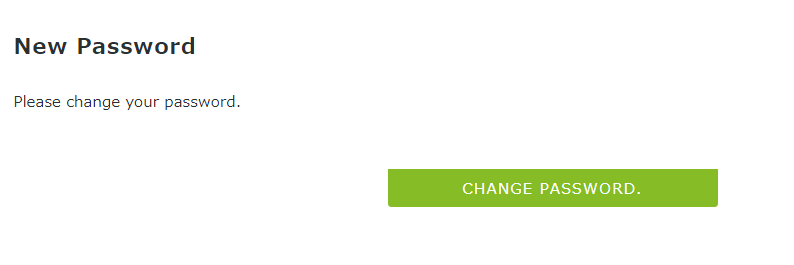
Changing your password
When you log in for the first time, using the password specified in the registration notification mail, the screen will change to the Password Change screen. Please click [CHANGE PASSWORD] button and set a password of your choice.
Even after setting a password, you will need to periodically change it. If you need to change your password, the display transfers to the password change screen in the same way as when logging in for the first time. Then, change your password.
If you forget your password
If you forget your password, specify your password again, referring to “IF YOU FORGOT YOUR PASSWORD”.
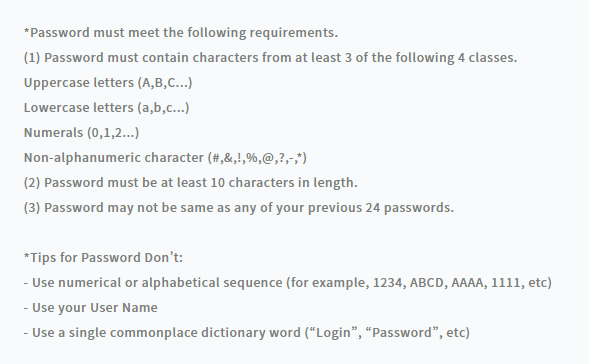
Password policy
Next process
- Home
- 1. OPERATING PROCEDURES
- INITIAL AUTHENTICATION
INITIAL AUTHENTICATION
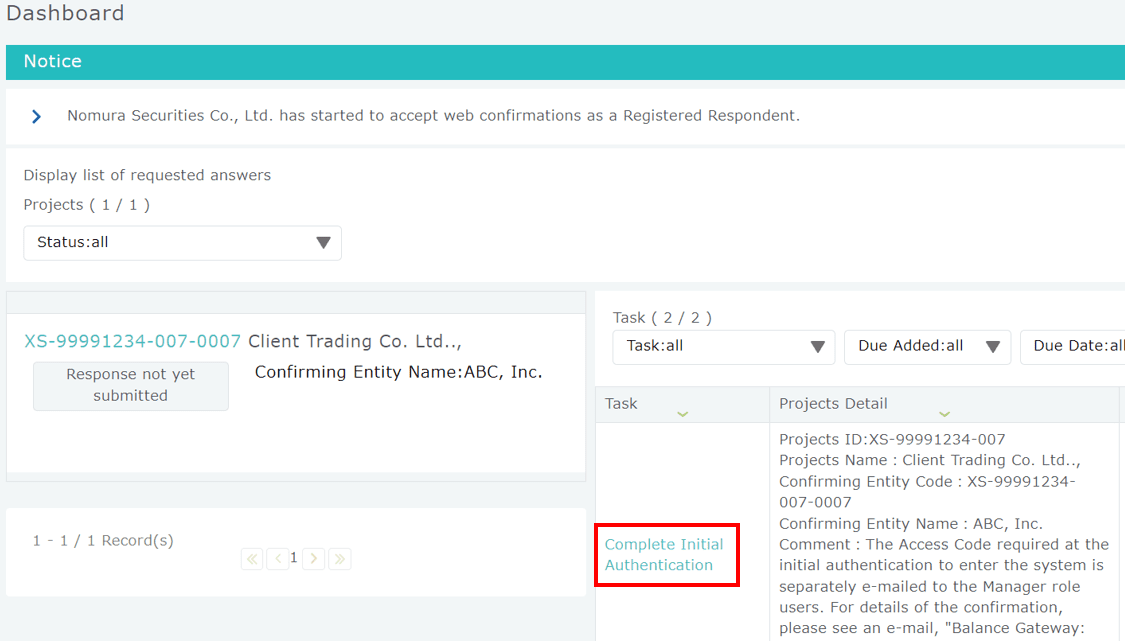
Complete initial authentication for each confirmation request. Displays the [Dashboard] screen. Click the [Complete Initial Authentication] link from the task list on the right side of the screen.
Entering the initial authentication code
When “Balance Gateway Initial Authentication” screen appears please enter the Initial Authentication Code described in “RECEIVE USER REGISTRATION EMAIL AND INITIAL AUTHENTICATION CODE” and click [Agree to the “Terms of Use” and continue] button to complete the initial authentication. Then, [Complete Initial Authentication] task is no longer indicated in “Dashboard” screen.
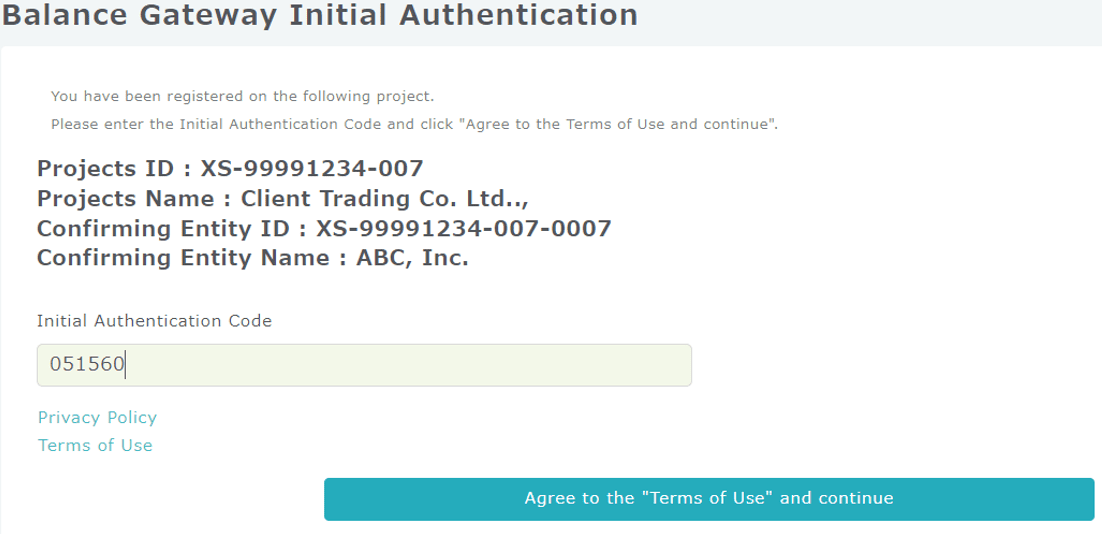
It is required to complete initial authentication for each project and the Access Code varies for each of them.
Next process
- Home
- 1. OPERATING PROCEDURES
- REPLY TO CONFIRMATION REQUEST
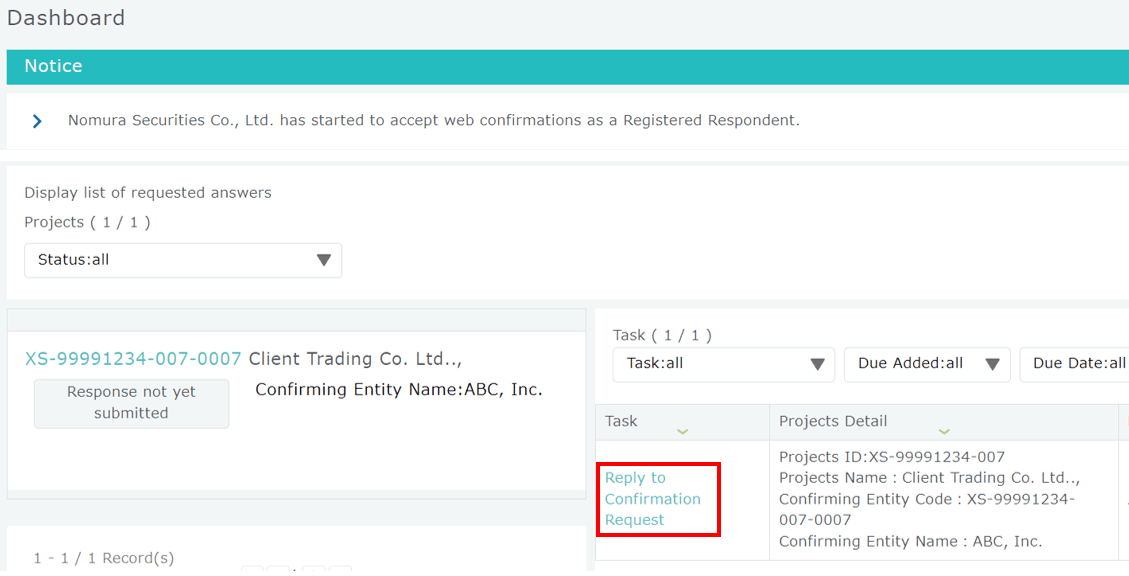
REPLY TO CONFIRMATION REQUEST
Confirm the confirmation requests from the auditors and enter a response.
Managers and General Users can enter responses.
Click [Reply to Confirmation Request] link indicated in the task to display [Reply to Confirmation Request] screen.
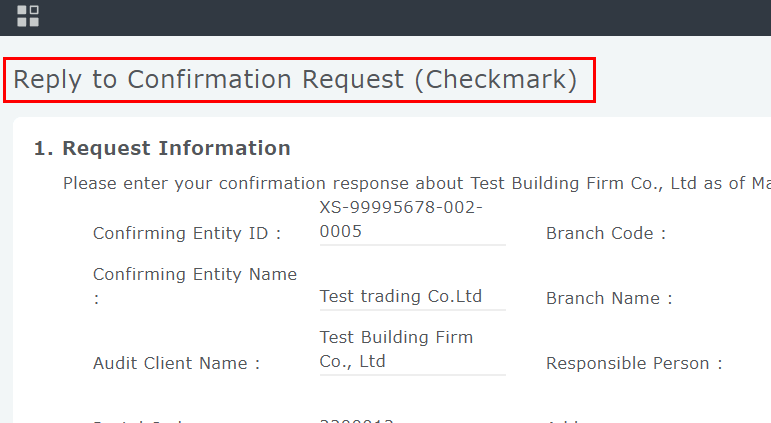
Checking the format
The [Reply to Confirmation Request] screen is divided into three types depending on the confirmation format.
The confirmation format can be checked in the upper left of the [Reply to Confirmation Request] screen. Answer according to the format.
- Home
- 1. OPERATING PROCEDURES
- REPLY TO CONFIRMATION REQUEST
- How to enter the response: Checkmark form
How to enter the response: Checkmark form
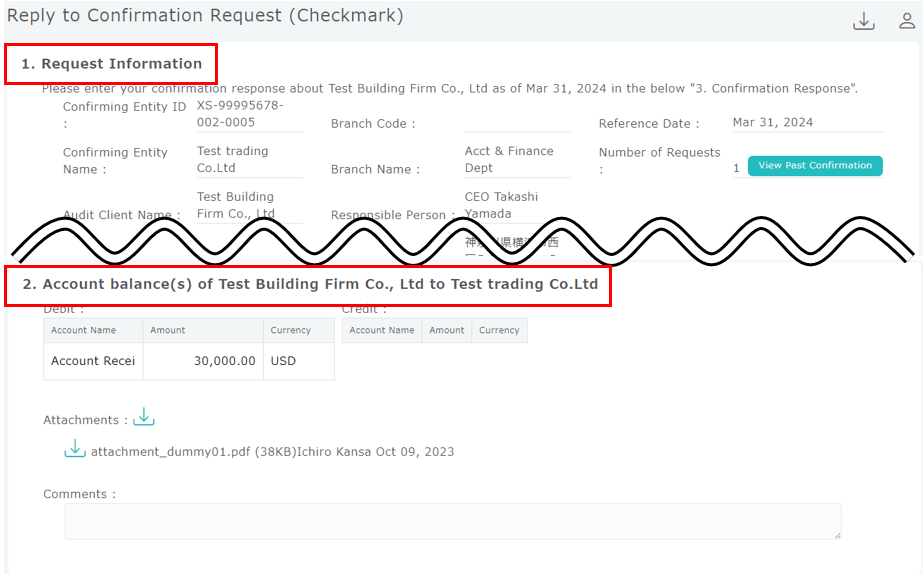
Checking the response request details
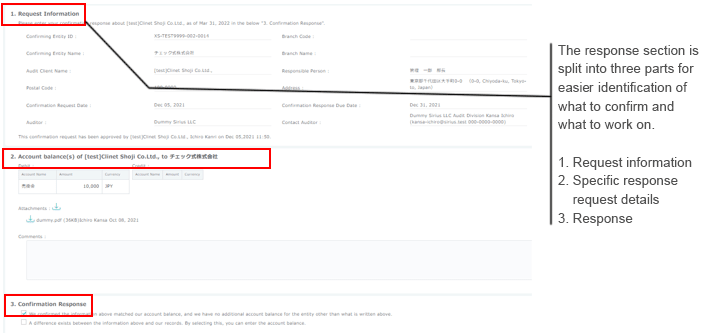
The [Reply to Confirmation Request] screen is divided into three main sections from the top.
[1. Request Information] contains the information about the audit team and the audited company, and [2. Account balance(s) of <<audited company name>> to <<your company name>>] contains the balance of receivables and payables of the audited company that is to be confirmed.
If the response request includes an attachment, you can click the attachment of [2. Account balance(s) of <<audited company name>> to <<your company name>>] () to download it.
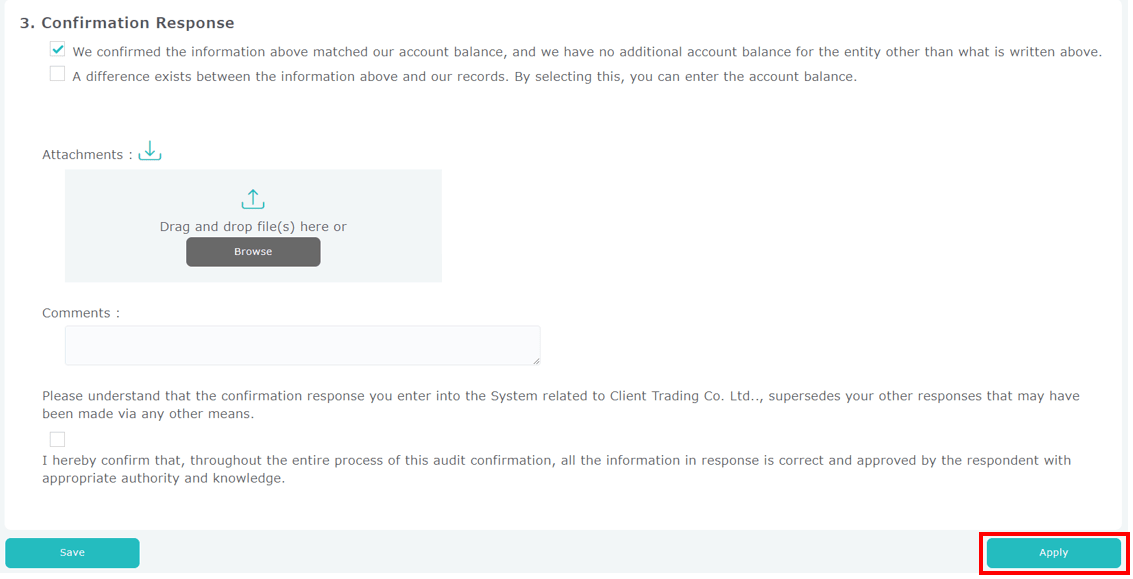
Entering your response
Enter your response in the [3. Confirmation Response] section.
After confirming the details of the response request, select either one of the check boxes to answer it.
When there is no difference in the confirmation:
Select [We confirmed the information above matched our account balance, and we have no additional account balance for the entity other than what is written above.] checkbox.
When there are differences in the confirmation:
Select [A difference exists between the information above and our records.] checkbox. You will be sent to the account balance input field of the Input form. Please refer to “How to enter the response: Input form”.
If you want to hide the entry-type account balance entry field after it has been displayed, clear the [A difference exists between the information above and our records.] check box.
Other operations
You can also attach detailed documents to your response and enter comments.
To attach a file, drop the file into “Drag and drop file(s) here” field in [3. Confirmation Response], or click the [Browse] button at the bottom of the screen and select the file.
If you want to save the response you are entering, click the [Save] button at the bottom left of the screen.
(Reference) Details of each item
Item descriptions for “Reply to Confirmation Request (Checkmark form)” are as follows. Please refer to “How to enter the response: Input form” for the details of the Input form.

| Number | Item Name | Description |
|---|---|---|
| 1 | Account balance, etc. confirmation PDF download button | Outputs the saved response input status as a PDF. |
| 2 | User information button | Allows you to view and edit the user information associated with the confirmation request information you are referencing. |
| 3 | Request information | Displays information on the auditor requesting for response and the audited company. Also displays the response due date, confirmation reference date, and contact information for inquiries to the auditor. |
| 4 | Credits and debits | Displays the accounts, amount, and currency of the audited company. |
| 5 | Batch download button (requester attachment data) | Allows you download files attached by auditors and audited companies at once. |
| 6 | Requester attachment data | Data attached by the confirmation requester. Multiple files are displayed in multiple lines. You can download files individually by pressing the |
| 7 | Comments | Displays comments from the auditor or the audited company, if any. |
| 8 | No discrepancy checkbox | Select this if your response is that there is no discrepancy with the confirmation request amount. |
| 9 | Discrepancy checkbox | Select this if your response is that there is a discrepancy with the confirmation request amount. The account balance input field of the "Input form" will be displayed. Enter the response amount. |
| 10 | Batch download button (responder attachment data) | Allows you download files attached by responders at once. |
| 11 | Responder attachment data | Data attached by the responder. Multiple files are displayed in multiple lines. You can download files individually by pressing the You can delete the attachment data by pressing the |
| 12 | Upload field and [Browse] button | Allows you to upload attachments when responding. Drop the file in the upload field (square gray area), or click the [Browse] button and select the file you want to upload. The supported file formats are pdf, xls, xlsx, csv, txt, doc, docx, and zip. |
| 13 | Comments | Enter comments for the auditor in this field, if any. |
| 14 | Pledge check | Pledge that you are an appropriate confirmation responder with the authority and knowledge to respond and that the information provided is accurate. Responses can be approved by selecting this checkbox. |
| 15 | Save | Temporarily saves the response you have entered currently. |
| Cancel apply | If you are unsatisfied with your applied response, you can cancel the application by clicking this button. Displayed only for general users. | |
| 16 | Apply for response | Applies to the management user with the entered response. Displayed only for general users. |
| Approve response | Click this button if you are satisfied with the response submitted to you or with the response you entered. Displayed only for managers. | |
| Deny application | Click this button if you are unsatisfied with the response submitted to you and want to request the applicant to enter it again. Displayed only for managers. | |
| Sending back to the auditor | Sends back a confirmation letter to the auditor. You can add comments. Displayed only for managers. |
Next process
- When the [Apply] button is displayed in the lower right of the [Reply to Confirmation Request] screen >> APPLYING THE RESPONSE APPROVAL (GENERAL USER)
- When the [Approve] button is displayed in the lower right of the [Reply to Confirmation Request] screen >> APPROVING RESPONSES (ADMINISTRATOR USER)
- Home
- 1. OPERATING PROCEDURES
- REPLY TO CONFIRMATION REQUEST
- How to enter the response: Input form
How to enter the response: Input form
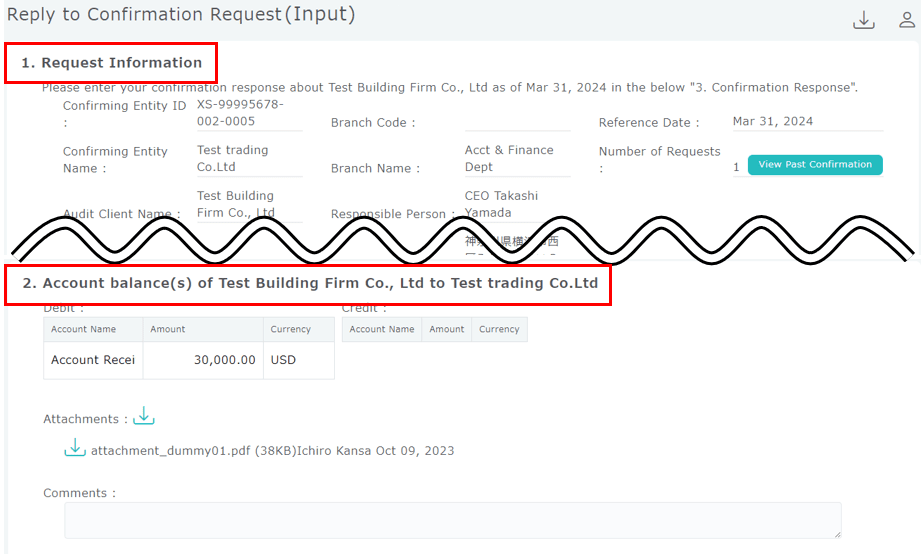
Checking the response request details
The [Reply to Confirmation Request] screen is divided into three main sections from the top.
[1. Request Information] contains the information about the audit team and the audited company, and [2. Account balance(s) of <<audited company name>> to <<your company name>>] contains the balance of receivables and payables of the audited company that is to be confirmed.
If the response request includes an attachment, you can click the attachment of [2. Account balance(s) of <<audited company name>> to <<your company name>>] () to download it.
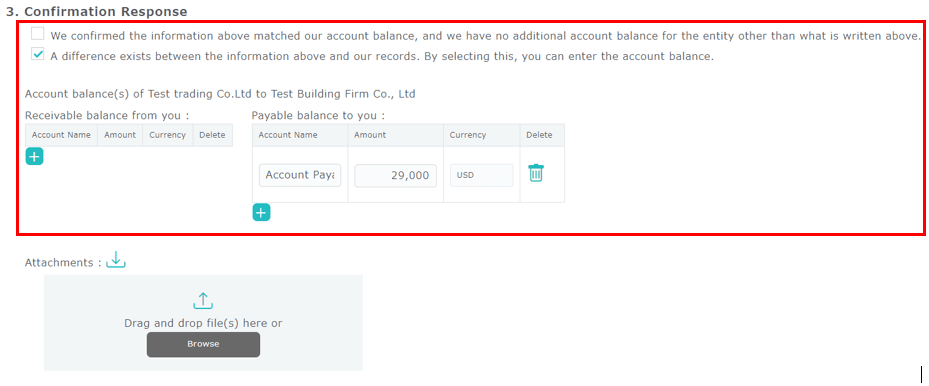
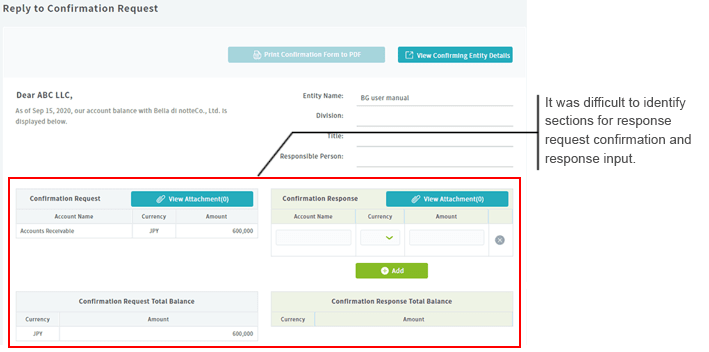
Entering your response
Enter your response in the [3. Confirmation Response] section.
Click the [+] button in the [Receivable balance from you:] and [Payable balance to you:] fields to display the account balance entry field. Enter or select [Account Name], [Amount], and [Currency] about the recognized amount of receivables and payables in your company, and answer it.
If you want to add more entry lines, click the [+] button again. If you want to delete entry lines, click the button.

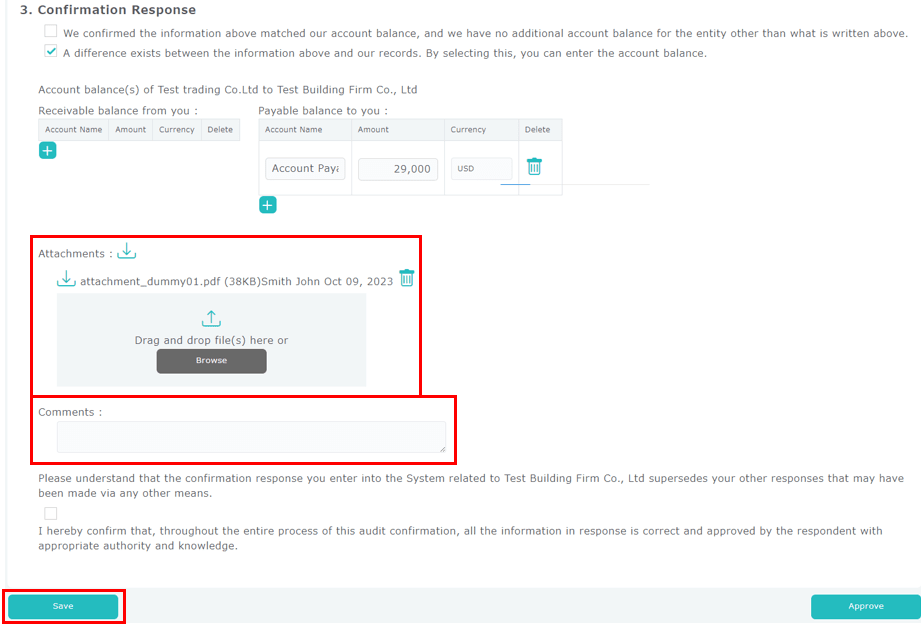
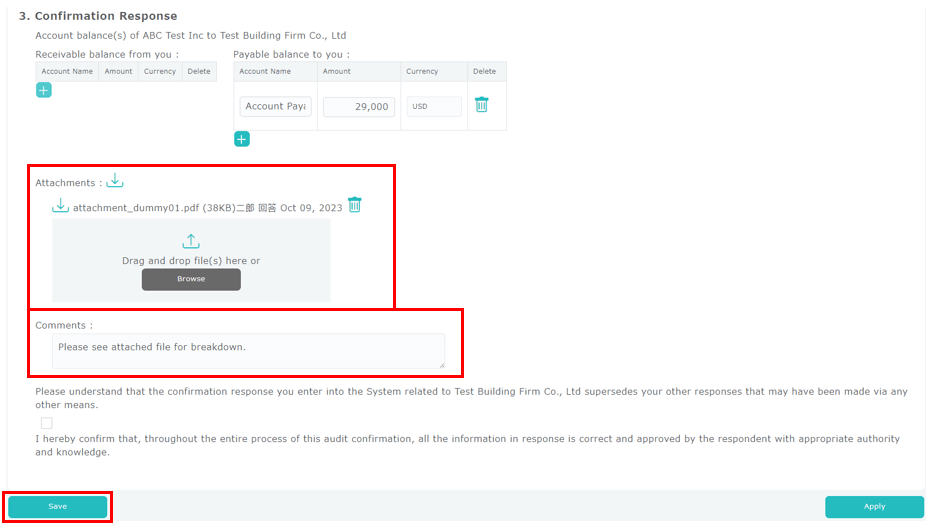
Other operations
You can also attach detailed documents to your response and enter comments.
To attach a file, drop the file into “Drag and drop file(s) here” field in [3. Confirmation Response], or click the [Browse] button at the bottom of the screen and select the file.
If you want to save the response you are entering, click the [Save] button at the bottom left of the screen.
(Reference) Details of each item
Item descriptions for “Reply to Confirmation Request (Input form)” are as follows.

| Number | Item Name | Description |
|---|---|---|
| 1 | Account balance, etc. confirmation PDF download button | Outputs the saved response input status as a PDF. |
| 2 | User information button | Allows you to view and edit the user information associated with the confirmation request information you are referencing. |
| 3 | Request information | Displays information on the auditor requesting for response and the audited company. Also displays the response due date, confirmation reference date, and contact information for inquiries to the auditor. |
| 4 | Credits and debits (requester data) | Displays the accounts, amount, and currency of the audited company. |
| 5 | Batch download button (requester attachment data) | Allows you download files attached by auditors and audited companies at once. |
| 6 | Requester attachment data | Data attached by the confirmation requester. Multiple files are displayed in multiple lines. You can download files individually by pressing the |
| 7 | Comments | Displays comments from the auditor or the audited company, if any. |
| 8 | Receivable balance and Payable balance (responder data) | Click the [+] button to display the account balance input field. Enter the account, amount, and currency. Click the [+] button again to add a row. Click the |
| 9 | Batch download button (responder attachment data) | Allows you download files attached by responders at once. |
| 10 | Responder attachment data | Data attached by the responder. Multiple files are displayed in multiple lines. You can download files individually by pressing the You can delete the attachment data by pressing the |
| 11 | Upload field and [Browse] button | Allows you to upload attachments when responding. Drop the file in the upload field (square gray area), or click the [Browse] button and select the file you want to upload. The supported file formats are pdf, xls, xlsx, csv, txt, doc, docx, and zip. |
| 12 | Comments | Enter comments for the auditor in this field, if any. |
| 13 | Pledge check | Pledge that you are an appropriate confirmation responder with the authority and knowledge to respond and that the information provided is accurate. Responses can be approved by selecting this checkbox. |
| 14 | Save | Temporarily saves the response you have entered currently. |
| Cancel apply | If you are unsatisfied with your applied response, you can cancel the application by clicking this button. Displayed only for general users. | |
| 15 | Apply for response | Applies to the management user with the entered response. Displayed only for general users. |
| Approve response | Click this button if you are satisfied with the response submitted to you or with the response you entered. Displayed only for managers. | |
| Deny application | Click this button if you are unsatisfied with the response submitted to you and want to request the applicant to enter it again. Displayed only for managers. | |
| Sending back to the auditor | Sends back a confirmation letter to the auditor. You can add comments. Displayed only for managers. |
Next process
- When the [Apply] button is displayed in the lower right of the [Reply to Confirmation Request] screen >> APPLYING THE RESPONSE APPROVAL (GENERAL USER)
- When the [Approve] button is displayed in the lower right of the [Reply to Confirmation Request] screen >> APPROVING RESPONSES (ADMINISTRATOR USER)
- Home
- 1. OPERATING PROCEDURES
- REPLY TO CONFIRMATION REQUEST
- How to enter the response: Reference attachment form
How to enter the response: Reference attachment form
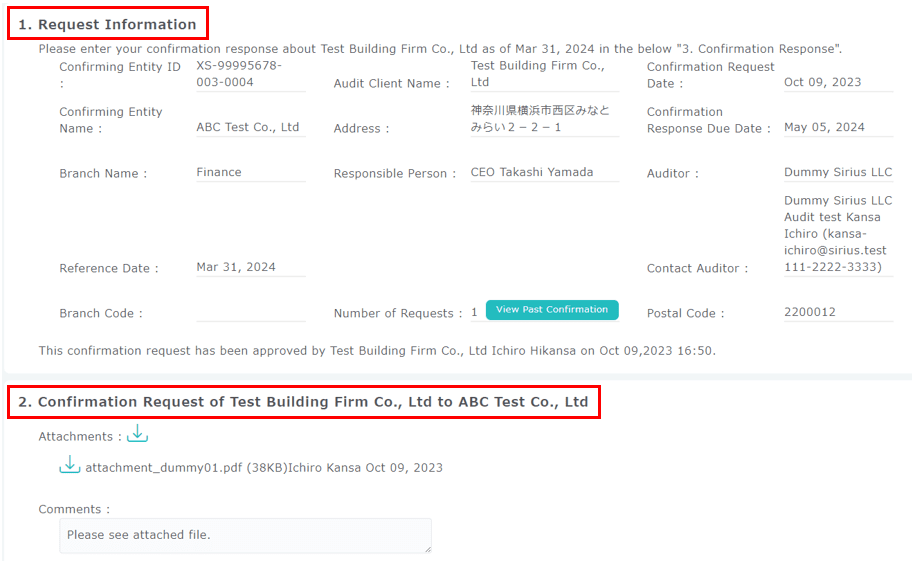
Checking the response request details
The [Reply to Confirmation Request] screen is divided into three main sections from the top.
[1. Request Information] contains the information about the audit team and the audited company, and [2. Confirmation Request of <<audited company name>> to <<your company name>>] includes the details of the auditor's confirmation request in the form of a comment or attached files.
If the response request includes an attachment, you can click the attachment of [2. Confirmation Request of <<audited company name>> to <<your company name>>] () to download it.
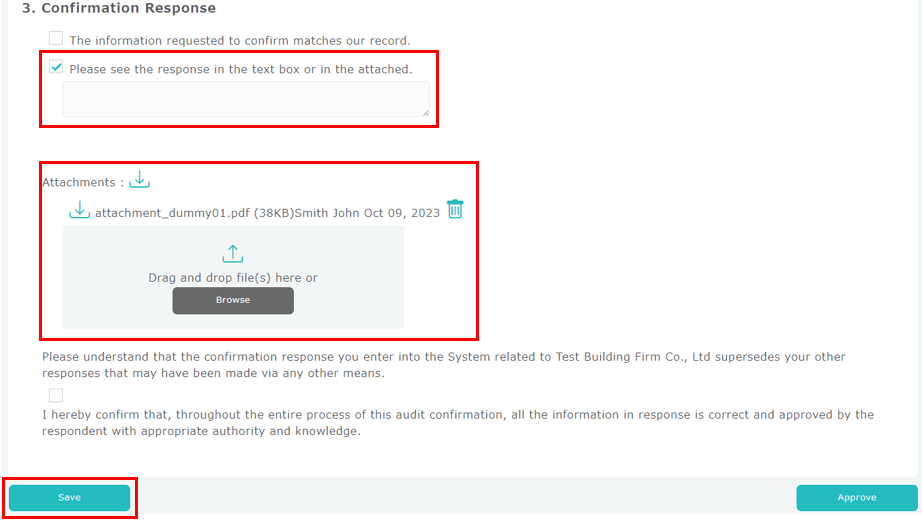
Entering your response
Enter your response in the [3. Confirmation Response] section.
After confirming the details of the response request, select either one of the check boxes to answer it.
When there is no difference in the confirmation:
Select [The information requested to confirm matches our record.] checkbox.
When there are differences in the confirmation or when responding with attaching a file:
Select the [Please see the response in the text box or in the attached.] check box, and write your response or attach a file in the comment and attachment fields respectively.
To attach a file, drop the file into “Drag and drop file(s) here” field in [3. Confirmation Response], or click the [Browse] button at the bottom of the screen and select the file.
If you want to save the response you are entering, click the [Save] button at the bottom left of the screen.
(Reference) Details of each item
Item descriptions for “Reply to Confirmation Request (Reference attachment form)” are as follows.

| Number | Item Name | Description |
|---|---|---|
| 1 | Account balance, etc. confirmation PDF download button | Outputs the response input status at the time of display as a PDF. |
| 2 | User information button | Allows you to view and edit the user information associated with the confirmation request information you are referencing. |
| 3 | Request information | Displays information on the auditor requesting for response and the audited company. Also displays the response due date, confirmation reference date, and contact information for inquiries to the auditor. |
| 4 | Batch download button (requester attachment data) | Allows you download files attached by auditors and audited companies at once. |
| 5 | Requester attachment data | Data attached by the confirmation requester. Multiple files are displayed in multiple lines. You can download files individually by pressing the |
| 6 | Comments | Displays comments from the auditor or the audited company, if any. |
| 7 | No discrepancy checkbox | Select this if there is no discrepancy in the content of the confirmation request field. |
| 8 | As described or in the attached file checkbox | If there is a discrepancy in the content of the confirmation request field, or if you want to respond with a file attachment, select "As described below or in the attached file", and enter a comment or upload a file attachment as necessary. |
| 9 | Batch download button (responder attachment data) | Allows you download files attached by responders at once. |
| 10 | Responder attachment data | Data attached by the responder. Multiple files are displayed in multiple lines. You can download files individually by pressing the You can delete the attachment data by pressing the |
| 11 | Upload field and [Browse] button | Allows you to upload attachments when responding. Drop the file in the upload field (square gray area), or click the [Browse] button and select the file you want to upload. The supported file formats are pdf, xls, xlsx, csv, txt, doc, docx, and zip. |
| 12 | Pledge check | Pledge that you are an appropriate confirmation responder with the authority and knowledge to respond and that the information provided is accurate. Responses can be approved by selecting this checkbox. |
| 13 | Save | Temporarily saves the response you have entered currently. |
| Cancel apply for response | If you are unsatisfied with your applied response, you can cancel the application by clicking this button. Displayed only for general users. | |
| 14 | Apply for response | Applies to the management user with the entered response. Displayed only for general users. |
| Approve response | Click this button if you are satisfied with the response submitted to you or with the response you entered. Displayed only for managers. | |
| Deny application | Click this button if you are unsatisfied with the response submitted to you and want to request the applicant to enter it again. Displayed only for managers. | |
| Sending back to the auditor | Sends back a confirmation letter to the auditor. You can add comments. Displayed only for managers. |
Next process
- When the [Apply] button is displayed in the lower right of the [Reply to Confirmation Request] screen >> APPLYING THE RESPONSE APPROVAL (GENERAL USER)
- When the [Approve] button is displayed in the lower right of the [Reply to Confirmation Request] screen >> APPROVING RESPONSES (ADMINISTRATOR USER)
- Home
- 1. OPERATING PROCEDURES
- APPLYING THE RESPONSE APPROVAL (GENERAL USER)
APPLYING THE RESPONSE APPROVAL (GENERAL USER)
After a general user creates a response, ask the administrator user for approval.
If the administrator enters a response, please proceed to APPROVING RESPONSES (ADMINISTRATOR USER).
When you have completed entering your response, click the [Apply] button in the lower right of the [Reply to Confirmation Request] screen.
The [Apply] dialog box is displayed. If necessary, enter a comment for the administrator user and click the [OK] button. A processing completion message is displayed at the top of the [Reply to Confirmation Request] screen, and the approval request is issued to the administrator user.
If the [Reply to Confirmation Request] task related to the response request for which you applied for approval disappears from the [Dashboard] screen, the approval application has been correctly implemented.
- Home
- 1. OPERATING PROCEDURES
- APPROVING RESPONSES (ADMINISTRATOR USER)
APPROVING RESPONSES (ADMINISTRATOR USER)
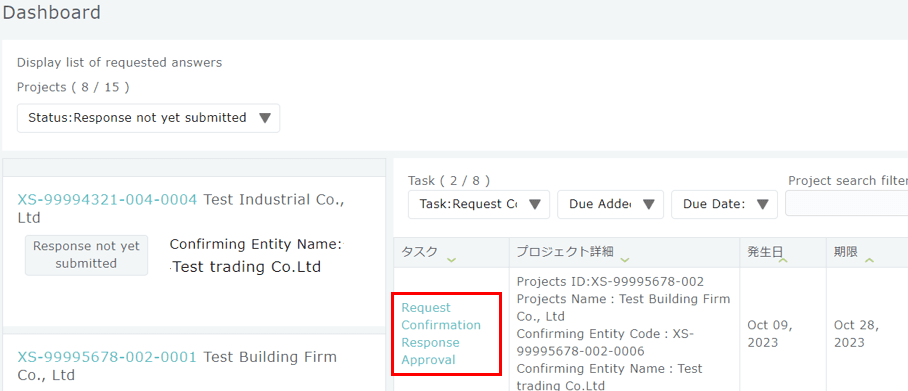
Checking the response details entered
The administrator user confirms the response specifics (including the attached details) received from the general user, and approves the response.
Click the [Request Confirmation Response Approval] link from the task list on the right side of the [Dashboard] screen to display the [Reply to Confirmation Request] screen for approval.
If the administrator user wants to enter the response, display the [Reply to Confirmation Request] screen from the [Reply to Confirmation Request] link.
The [Reply to Confirmation Request] screen is divided into three main sections from the top.
[1. Request Information] displays the information about the audit team and the audited company, and [2. Account balance <<or Confirmation Request>> of <<audited company name>> to <<your company name>>] displays the specific confirmation request details.
Then, the responses entered by general users or administrator users are displayed in [3. Confirmation Response], so check the contained information.
Approving the response
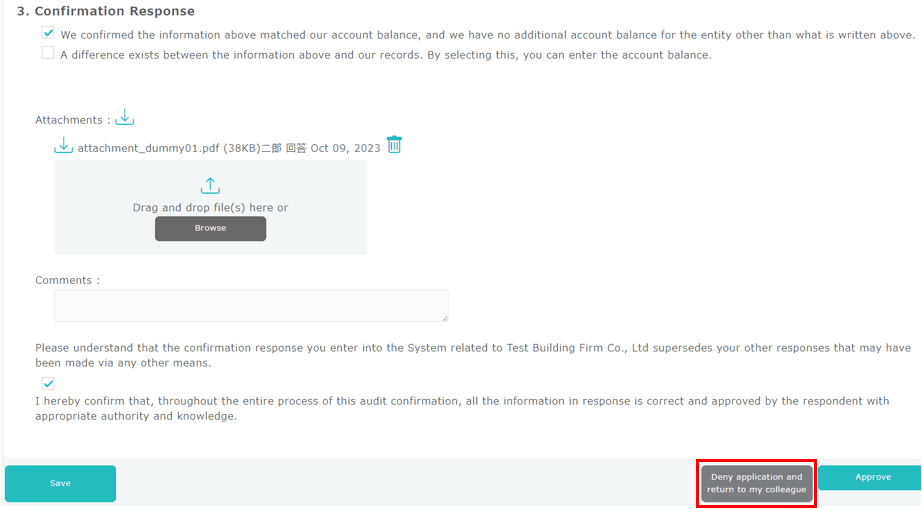
If there are no problems with the information entered, select the [I hereby confirm that, throughout the entire process of this audit confirmation, all the information in the response is correct and approved by the respondents with appropriate authority and knowledge] check box at the bottom of [3. Confirmation Response]. Then, click the [Approve] button at the bottom right of the screen.
Clicking on the [Approve] button without selecting the pledge check will result in an error. Also, if there is an attached file that was uploaded by a respondent user (a manager role user or a general user including yourself), clicking the [Approve] button without downloading the file will result in an error.
If the response needs to be corrected, the administrator user can correct the response details. Enter or correct the response while referring to "REPLY TO CONFIRMATION REQUEST".

Asking user who requested approval for corrections
If you want to ask the user who submitted the approval application to make corrections in order to correct the response details, click the [Deny application and return to my colleague] button at the bottom right of the screen.
The [Deny application and return to my colleague] dialog is displayed, so enter any comments as needed. A request to recreate the response is sent to the user who applied for approval.
Please note that the [Deny application and return to my colleague] button is only displayed on the administrator user's screen when a general user clicks the application button.
- Home
- 1. OPERATING PROCEDURES
- REJECT REQUEST
REJECT REQUEST
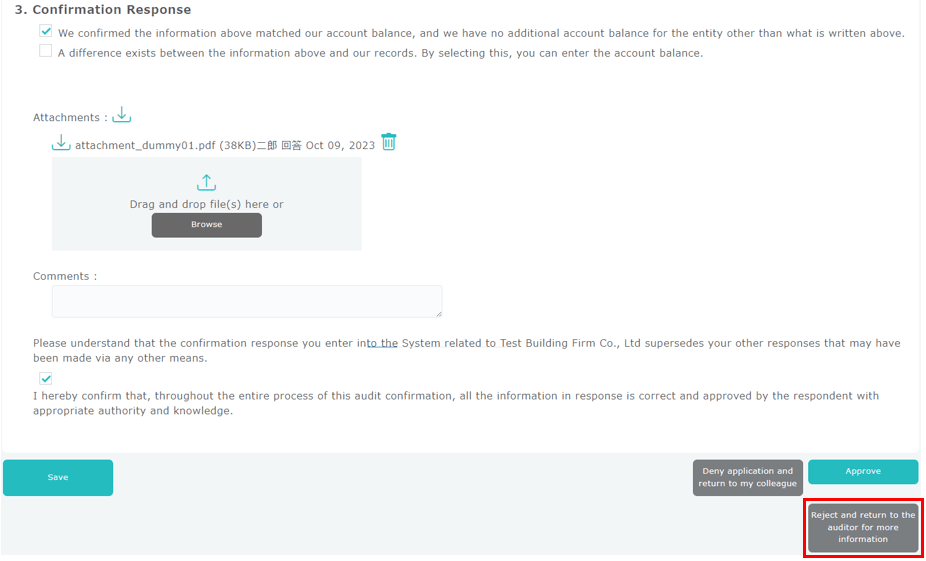
The administrator can send a request back to the auditor.
If you need to send it back, click [Reject and return to the auditor for more information] at the bottom right of the [Reply to Confirmation Request] screen. Then, the [Send the confirmation request back] dialog box is displayed.
Enter a comment regarding the reason the request is being sent back, and click the [OK] button.
A processing completion message is displayed, and the processing to send a request back to the auditor is executed.
If you reject an answer, the status will be classified as "Response submitted".
- Home
- 1. OPERATING PROCEDURES
- REQUEST FOR ANOTHER RESPONSE FROM AUDITOR
REQUEST FOR ANOTHER RESPONSE FROM AUDITOR
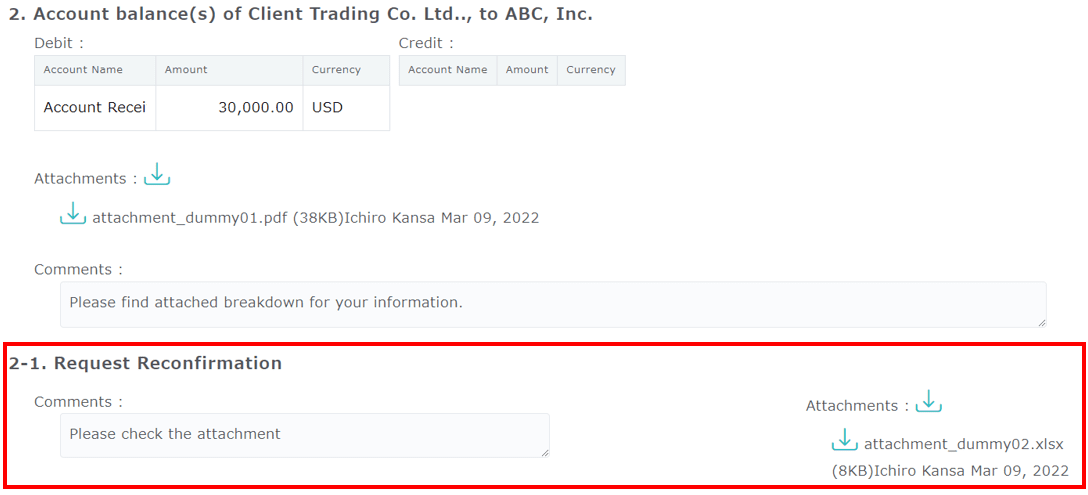
If the auditor confirms the contents of the response and is unsatisfied with the response request that has been responded or remanded, the auditor will request for another response.
If you are requested for another response, you will receive a notification email to that effect.
Email title
[Balance Gateway: Reply to confirmation request (re-requested by auditor) XX-00000000-001(Project ID)]
A new [2-1. Request Reconfirmation] will also be added in the middle of the [Reply to Confirmation Request] screen, and request comments, the reply date, and new attachments will be displayed.
The response method is the same as for regular requests, so refer to "REPLY TO CONFIRMATION REQUEST" and other sections.
2. OTHER OPERATIONS
- Home
- 2. OTHER OPERATIONS
- VIEW CONFIRMATION RESPONSE AFTER REPLYING TO CONFIRMATION REQUEST AND APPROVING CONFIRMATION RESPONSE
VIEW CONFIRMATION RESPONSE AFTER REPLYING TO CONFIRMATION REQUEST AND APPROVING CONFIRMATION RESPONSE
You can view your confirmation response after approving confirmation response.
Click confirmation responder ID link indicated in the project information column on [Dashboard] screen to display your confirmation response.
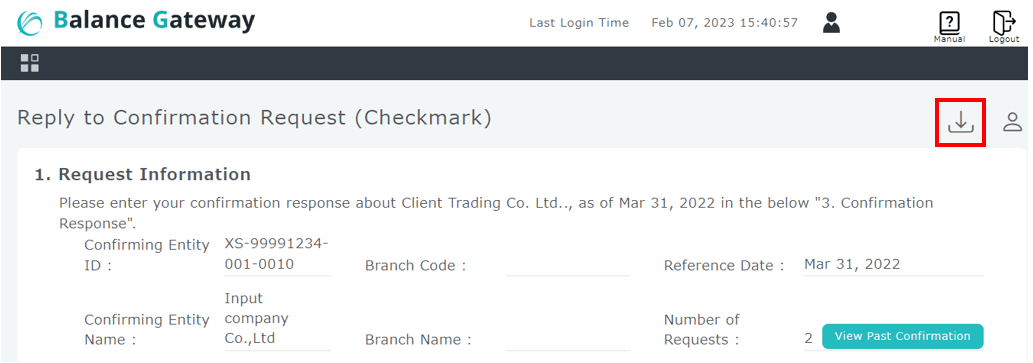
Also, if you want to print out the contents of your confirmation response, click the [Account balance, etc. confirmation PDF download] button on the upper right of the [Reply to Confirmation Request] screen.
Please note that the contents of the responses are deleted after a certain period.
- Home
- 2. OTHER OPERATIONS
- WHEN THE CONFIRMATION REQUEST IS OVERDUE/NOT RESPONDED IN TIME
WHEN THE CONFIRMATION REQUEST IS OVERDUE/NOT RESPONDED IN TIME
In the case there is no response by the due date indicated in [Dashboard] screen an email that asks for a response is sent automatically from Balance Gateway. The operation on Balance Gateway is valid even after the due date of the confirmation request. Also, when you are not responding within the indicated due date, please contact the auditor mentioned in [1. Request Information] on the [Reply to Confirmation Request] screen or the initial authentication code notification email as necessary.
- Home
- 2. OTHER OPERATIONS
- IF YOU ARE ASKED FOR RE-CONFIRMATION
IF YOU ARE ASKED FOR RE-CONFIRMATION
After your reply to confirmation request is approved if the audited company (auditor) needs to request you to re-confirm your response the manager and the general users would receive an email with the subject line "Balance Gateway: Reply to confirmation request (re-requested by auditor) XX_XXXXXXXX _ XXX (project ID)". In that case, please log into the system using the URL described in the email and provide your confirmation response again.
If there is a comment from the auditor, you can check it in the task area of the [Dashboard] screen.
Please refer to “REPLY TO CONFIRMATION REQUEST” for instructions on how to provide your confirmation response.
- Home
- 2. OTHER OPERATIONS
- FORCED COMPLETION OF CONFIRMATION LETTER BY AUDITOR
FORCED COMPLETION OF CONFIRMATION LETTER BY AUDITOR
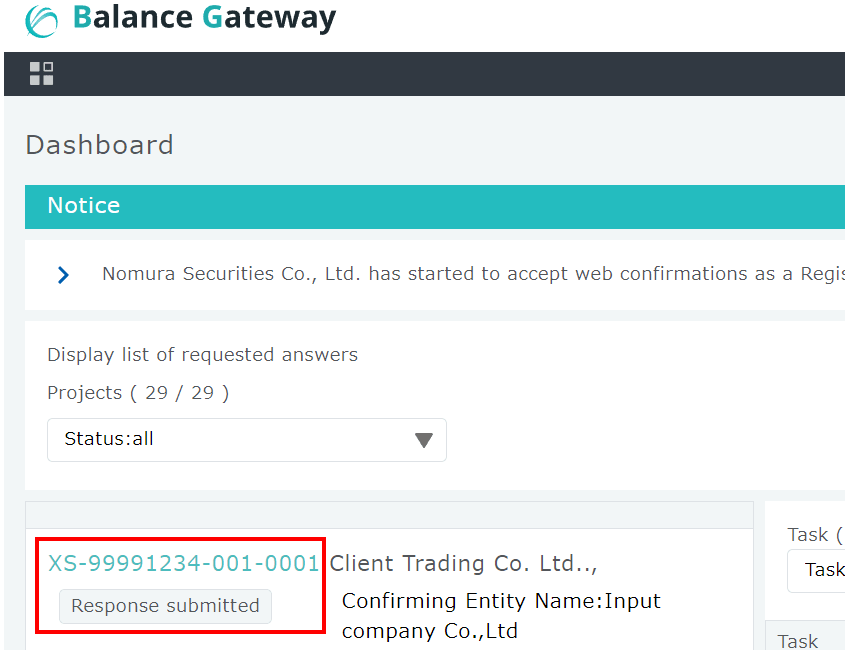
The auditor may forcibly complete the confirmation letter before you respond or reject.
After forced completion, the confirmation letter cannot be accessed.
Confirmation letters that have been forcibly completed are displayed in [Project Information] in the lower left of the [Dashboard] screen as shown in the image below.
If you have any questions about forced completion, please contact the listed auditor.

- Home
- 2. OTHER OPERATIONS
- ADD, EDIT, OR DELETE RESPONDING USERS
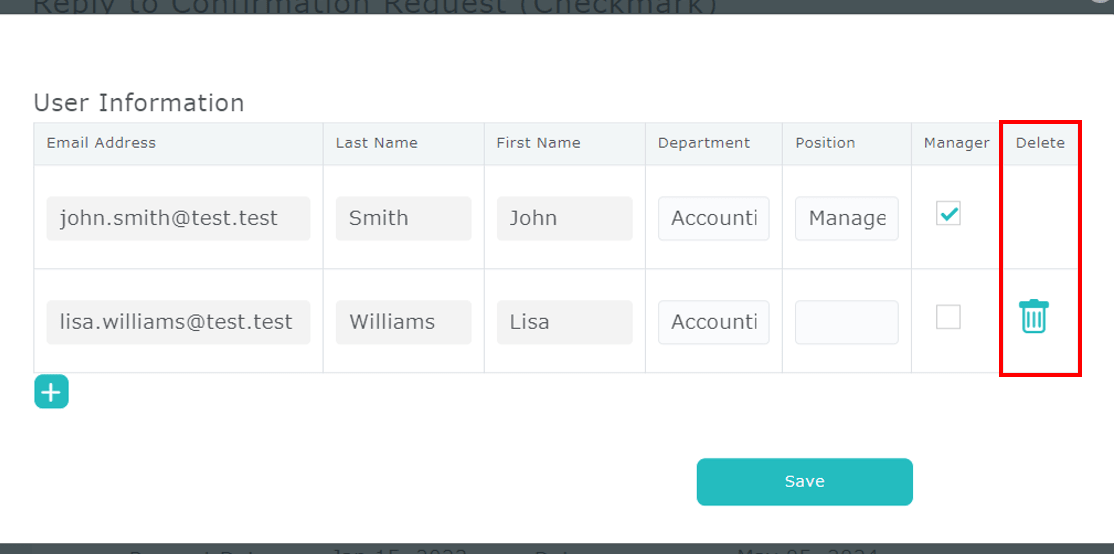
ADD, EDIT, OR DELETE RESPONDING USERS
Only a Manager is authorized to add, edit, and delete users.
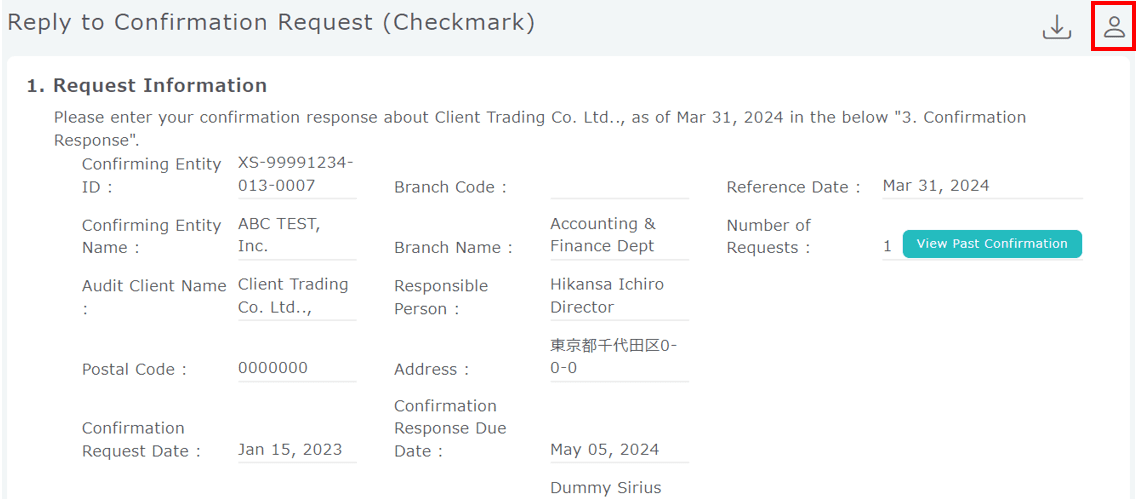
To add, edit, and delete users, click the [User information] button in the upper right of the “Reply to Confirmation Request” screen to display the [User information] screen.
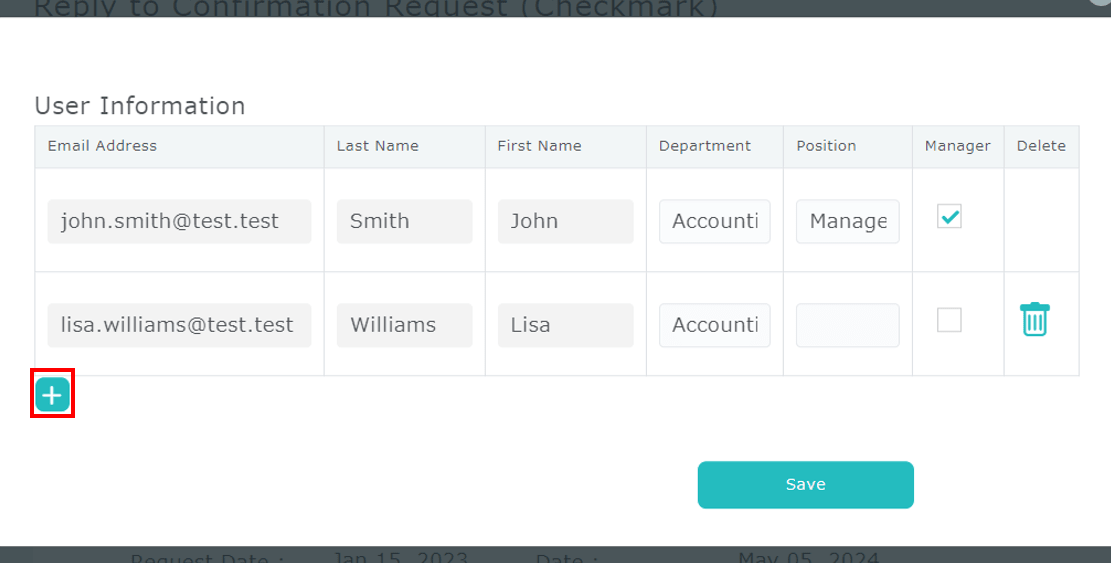
Add users
Click the [+] button in the lower left of the screen, enter the user details in the entry field, and click the [Save] button.
The items to be entered are as follows.
| Item Name | Required | Description |
|---|---|---|
| Email address | ✓ | Enter the email address of the user you want to add. |
| Last Name | ✓ | Enter the last name of the user you want to add. |
| First Name | ✓ | Enter the first name of the user you want to add. |
| Department | Enter the department of the user you want to add. This is the required item for managers. | |
| Title | Enter the job title of the user you want to add. This is the required item for managers. | |
| Checkbox for manager | Select this checkbox if the user you want to add is a manager. |
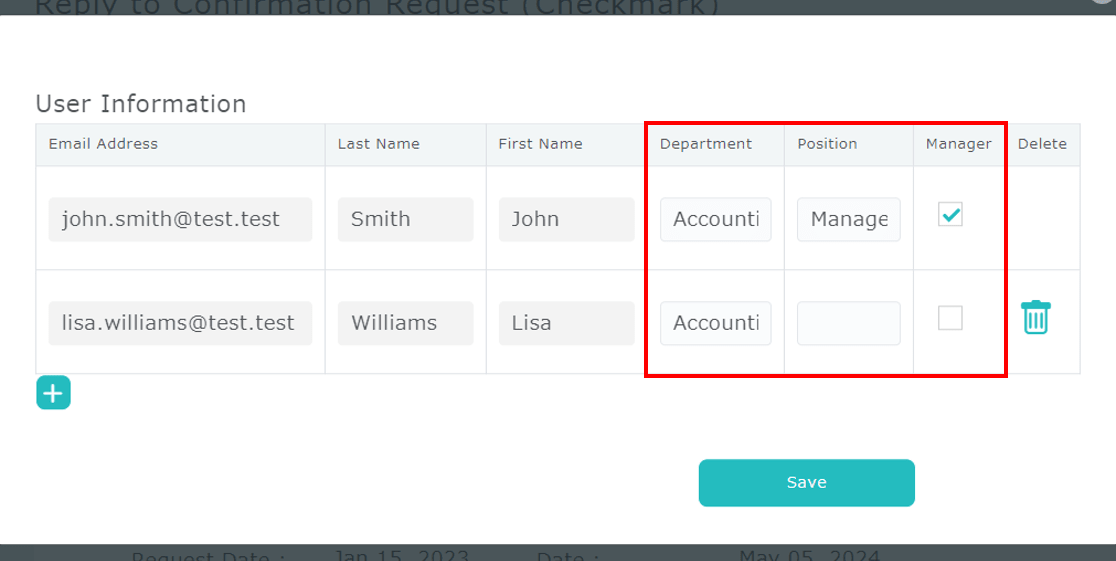
Edit users
Directly edit the [Department], [Position], and [Manager] of the desired user on the screen, and click the [Save] button.
For descriptions of each item, refer to "Add users".
Delete users
Click the button in the [Delete] column for the relevant user and click the [Save] button.
- Home
- 2. OTHER OPERATIONS
- EDIT YOUR USER INFORMATION
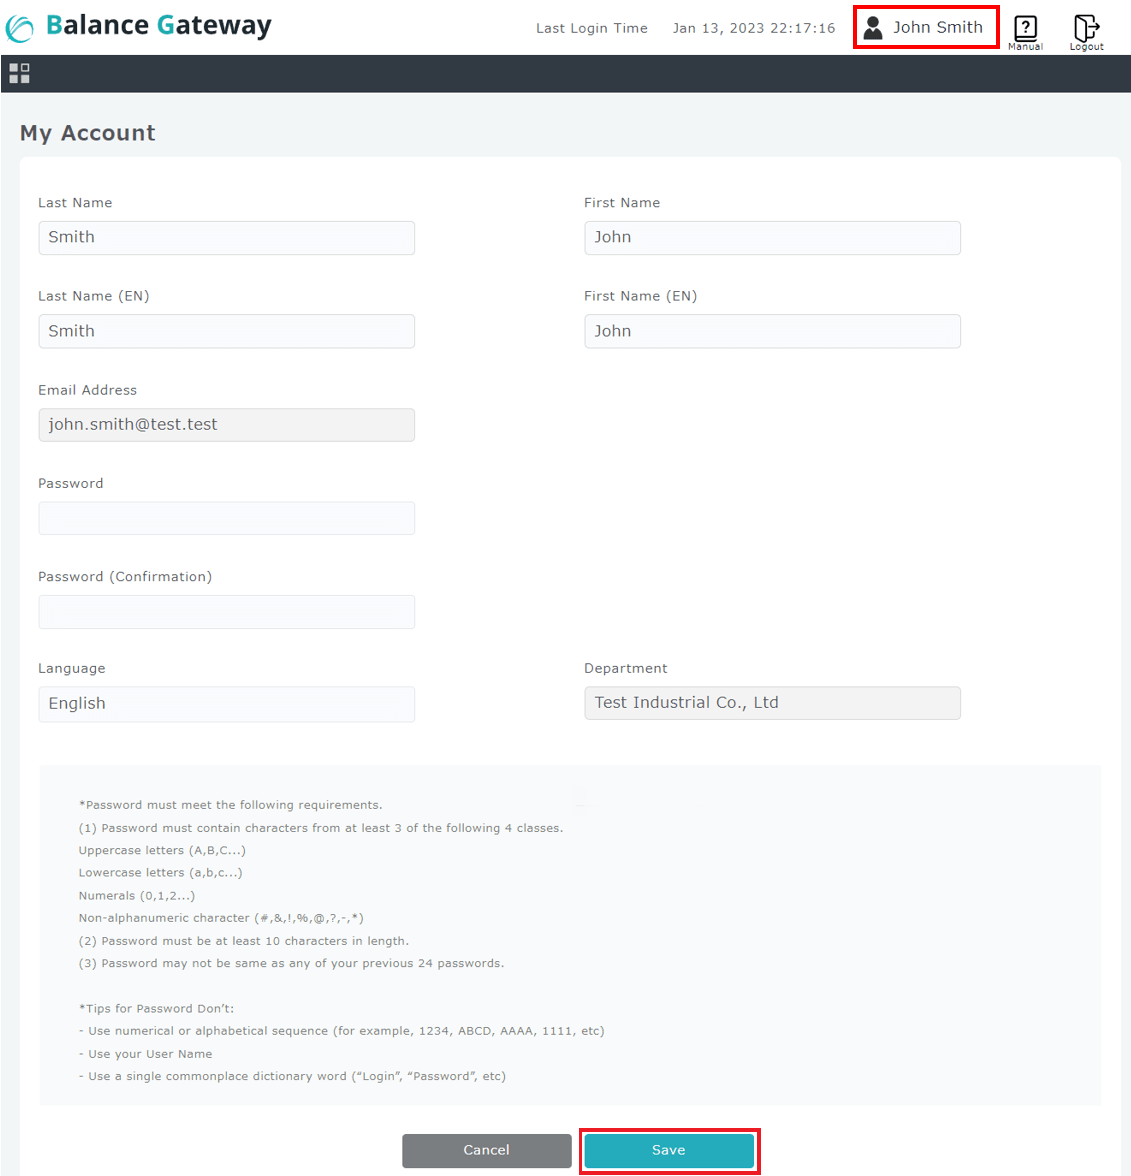
EDIT YOUR USER INFORMATION
Users can edit their own user information.
Display “User Details” screen by clicking log-in user name on the main form. Edit the user information (i.e. first and last name, password, language) as necessary, then click [Save] button.

- Home
- 2. OTHER OPERATIONS
- IF YOU FORGOT YOUR PASSWORD
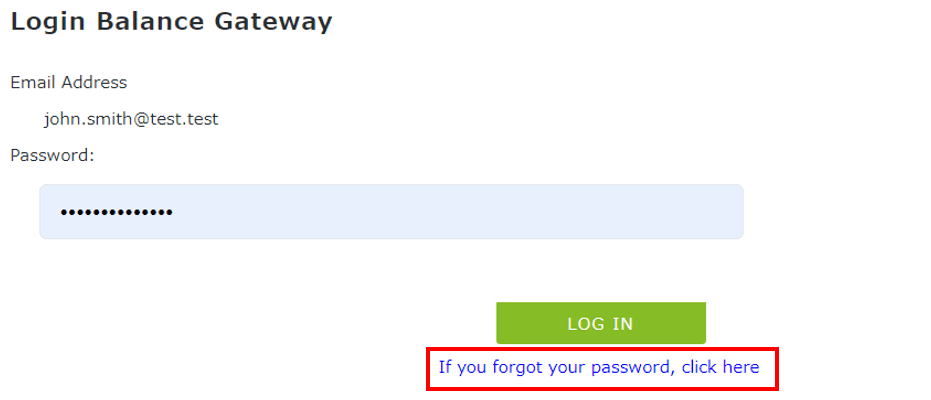
IF YOU FORGOT YOUR PASSWORD
If you have forgotten your password, enter your email address in the [Login Balance Gateway] screen and click [If you forgot your password, click here].
The screen moves to the [New Password] screen, where you need to enter your email address again and click the [Email One Time Password] button. A one time password notification email for resetting the password is sent to the email address you entered.
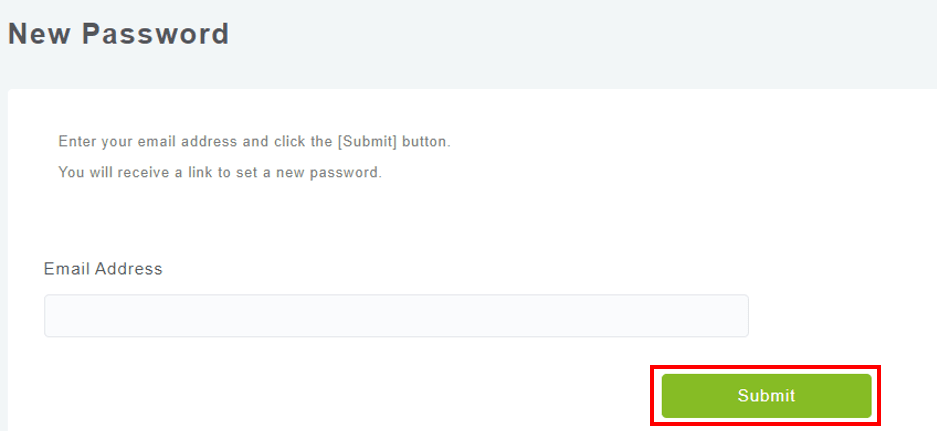
Enter the one time password that has been sent to you by email into the [New Password] screen and click the [Submit] button.
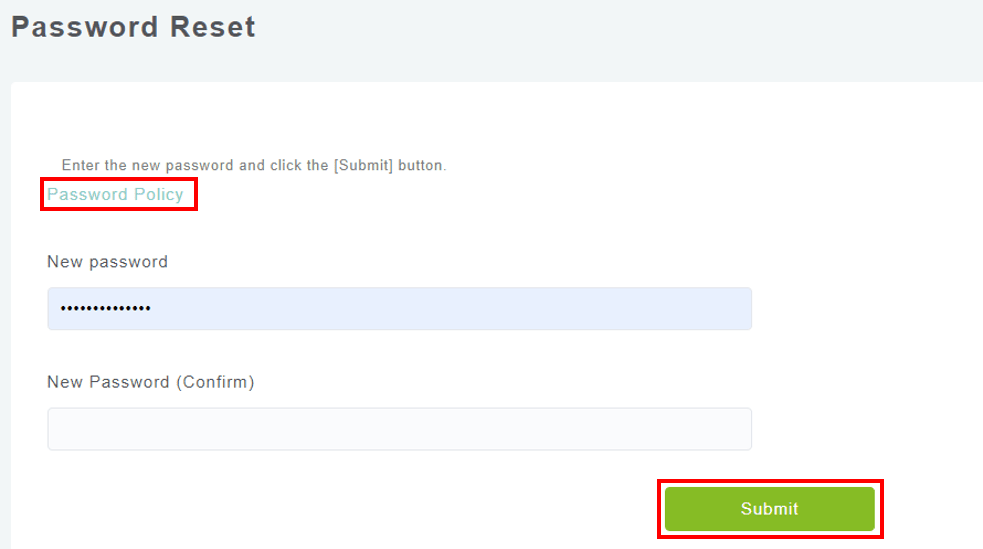
The screen moves to the [Password Reset] screen, where you can set the desired password that complies with the password policy, and click the [Submit] button to change your password.


- Home
- 2. OTHER OPERATIONS
- IF YOUR ACCOUNT IS LOCKED
IF YOUR ACCOUNT IS LOCKED
If you enter a different password more than a certain number of times in Login screen, your account will be locked. The account will be unlocked after a certain period, so please login again after a while.
REFERENCE INFORMATION
- Home
- REFERENCE INFORMATION
- BALANCE GATEWAY SCREEN
BALANCE GATEWAY SCREEN
Login Screen
The initial screen displayed when you access Balance Gateway site.
Main Screen
These items are always displayed at the top of the screen while logged into this system.

| Number | Items | Description |
|---|---|---|
| 1 | Dashboard button | Click to move to the [Dashboard] screen. |
| 2 | Login user | The logged-in username. You can view and edit the user details by clicking the user name. |
| 3 | Support button | Click to open the support page on the Audit Confirmation Center GK web site. Here, you can access FAQs and receive assistance through live chat. |
| 4 | MANUAL | Click to open the user manual, Balance Gateway Operation Manual For Confirming Entity. |
| 5 | Exit door icon button (Logout) | Click to log out of Balance Gateway. |
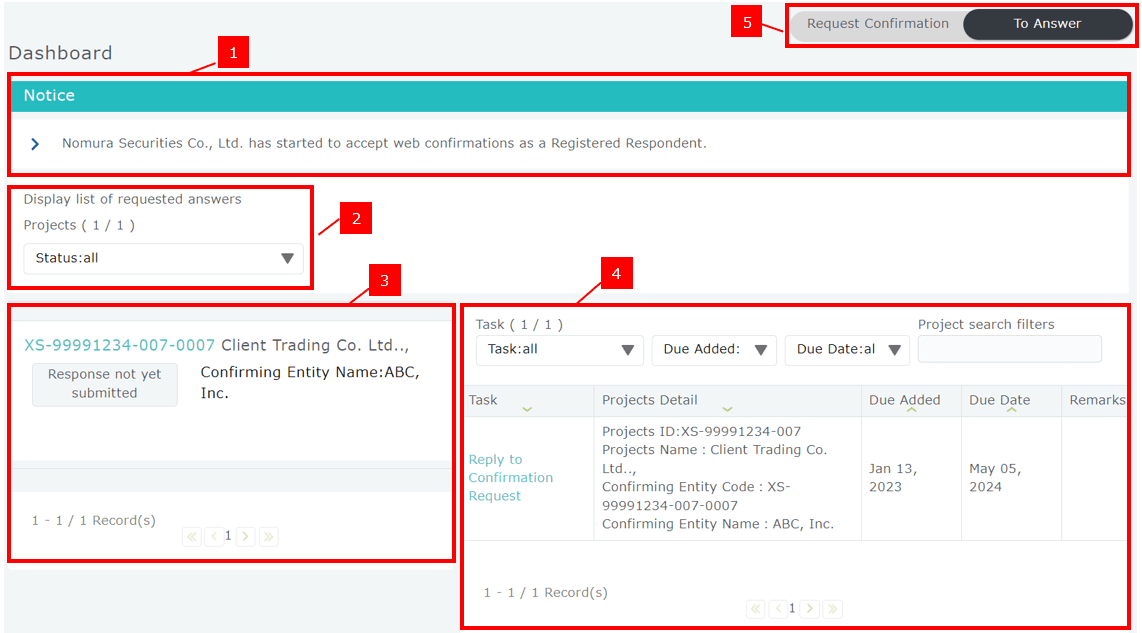
Dashboard
The first screen displayed after logging into the system. List of the tasks to be performed are displayed.
| Number | Items | Values |
|---|---|---|
| 1 | Notification | Displays notifications from Balance Gateway. |
| 2 | Filter | Specifies one project to display. |
| 3 | Project information | Displays the confirmation responder ID (confirmation letter) in charge. Those with no tasks currently are also displayed. |
| 4 | Task | Displays tasks that require operations or actions. |
| Project details | This displays project information managed by the audit team user. In the [Project search filters] field, you can search for tasks that include the string input in the [Projects Detail] field. | |
| Issue date | Displays the date when the task was issued. | |
| Deadline | This displays the deadline for the task. Operation is possible even after the due date has passed. | |
| Remarks | Displays "Deadline" for tasks on the due date, and "Overdue" for tasks past the due date. | |
| 5 | Request/Respond switch | If you select [Request Confirmation], information for audited company users is displayed. If you select [To Answer], information for confirmation respondent users is displayed. This is only displayed when you are logged in using the e-mail address set for audit team users and confirmation respondent users, or for audited company users and confirmation respondent users. |
- Home
- REFERENCE INFORMATION
- USER ROLES AND AUTHORITIES
USER ROLES AND AUTHORITIES
In this system, there are two roles (privileges) for each of the manager, and general user to carry out a confirmation response. The roles are as follows:
| Roles | Expected Title | Description |
|---|---|---|
| Manager | Head and section chief of the accounting department |
|
| General | Person in charge of accounting, etc. | Details of reply
|
- Home
- REFERENCE INFORMATION
- RELEASE NOTES
RELEASE NOTES
The Balance Gateway release notes are as follows.
| Version | Release date | Release notes |
|---|---|---|
| 8.2.00 | August 31, 2024 | Refer to Ver. 8.2.00. |
| 8.1.00 | February 17, 2024 | Refer to Ver. 8.1.00. |
| 8.0.00 | November 18, 2023 | Refer to Ver. 8.0.00. |
| 7.2.00 | May 27, 2023 | Fixed minor bugs. |
| 7.1.00 | February 18, 2023 | Fixed minor bugs. |
| 7.0.00 | November 19, 2022 | Refer to Ver. 7.0.00. |
| 6.2.00 | August 27, 2022 | Fixed minor bugs. |
| 6.1.06 | August 5, 2022 | Fixed minor bugs. |
| 6.1.05 | May 30, 2022 | Fixed minor bugs. |
| 6.1.04 | April 22, 2022 | Fixed minor bugs. |
| 6.1.03 | April 14, 2022 | Fixed minor bugs. |
| 6.1.02 | March 31, 2022 | Fixed minor bugs. |
| 6.1.01 | March 18, 2022 | Fixed minor bugs. |
| 6.1.00 | March 5, 2022 | Fixed minor bugs. |
| 6.0.04 | February 8, 2022 | Fixed minor bugs. |
| 6.0.03 | January 4, 2022 | Fixed minor bugs. |
| 6.0.02 | December 28, 2021 | Fixed minor bugs. |
| 6.0.01 | December 20, 2021 | Fixed minor bugs. |
| 6.0.00 | December 18, 2021 | Refer to Ver. 6.0.00. |
- Home
- REFERENCE INFORMATION
- RELEASE NOTES
- Ver. 8.2.00
Ver. 8.2.00
On August 31, 2024, we released version "8.2.00" of Balance Gateway.
In version "8.2.00", the Balance Gateway authentication infrastructure has been changed from the conventional in-house development and operation (on-premise) to Microsoft Azure (cloud service). Other Balance Gateway functions remain unchanged from the previous version.
- In addition to the previous "Google Authenticator", you can now use "Microsoft Authenticator" as a multi-factor authentication (MFA) app that displays one time passwords.
- We have changed (simplified) the method to reset the password in case you forget your password. We have improved the process of resetting your password to make it simpler by allowing you to enter the one time password (which you receive via email for password reset) in the same window where you are resetting your password, without having to open a separate window from the link provided in the email.
Because the Balance Gateway authentication infrastructure has changed, we are asking users to take the following measures.
- You need to change your password when logging in to Balance Gateway for the first time after upgrading the version.
Users whose last login to Balance Gateway occurred after June 2024 and for whom the audit team’s verification process has not yet been completed will receive an e-mail from Balance Gateway (sender: noreply@balancegateway.jp) to reset their password (subject: 'Notice of Balance Gateway Temporary Password') on Saturday, August 31, 2024. Please change the temporary password provided in the e-mail to your own password.
For users other than those mentioned above, a password reset e-mail will not be sent. When logging in for the first time after the version is upgraded, change your password to your preferred one by clicking [If you forgot your password, click here].
- Home
- REFERENCE INFORMATION
- RELEASE NOTES
- Ver. 8.1.00
Ver. 8.1.00
The Balance Gateway ver 8.1.00 release notes are as follows.
- We have fixed an issue where, when the audit team user has reverted the confirmation procedure that has been forcibly completed, the [Reply to Confirmation Request] task would not be generated again for the confirmation respondent.
- We have fixed an issue where the initial authentication notification email sent to the confirmation respondent administrator user contained multiple audit firm names.
Several other functions have been changed for improved usability.
- Home
- REFERENCE INFORMATION
- RELEASE NOTES
- Ver. 8.0.00
Ver. 8.0.00
The Balance Gateway ver 8.0.00 release notes are as follows.
- A support button has been added to the Balance Gateway main screen. Click this button to go to the support page on the Audit Confirmation Center GK website.
- All numbers on the screen are now aligned to the right to improve readability.
- The text of the email ([Balance Gateway: Registration notice and request to confirm balance] and [Balance Gateway: Registration Notice and request to confirm balance (Initial Authentication Code)]) sent to confirmation respondents when web confirmation is received has been reevaluated and revised so that it will be easier for the respondents to follow the instructions.
Several other functions have been changed for improved usability.
- Home
- REFERENCE INFORMATION
- RELEASE NOTES
- Ver. 7.0.00
Ver. 7.0.00
The following functions have been added or changed.
- A confirmation letter cannot be accessed if the auditor forcibly completes it before a response.
- Comments are now required when rejecting confirmation letters.
Several other functions have been changed for improved usability.
- Home
- REFERENCE INFORMATION
- RELEASE NOTES
- Ver. 6.0.00
Ver. 6.0.00
Overall UI improvements
Incorporated user opinions to improve UI for easier understanding and use.
Dashboard screen
Ver. 5
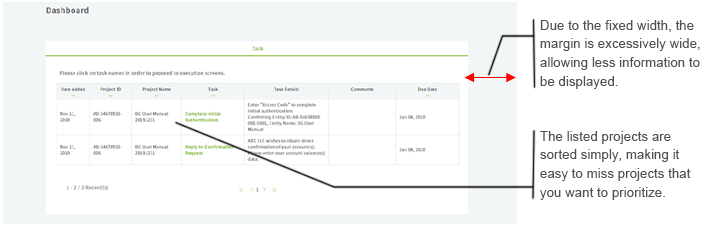
Ver. 6
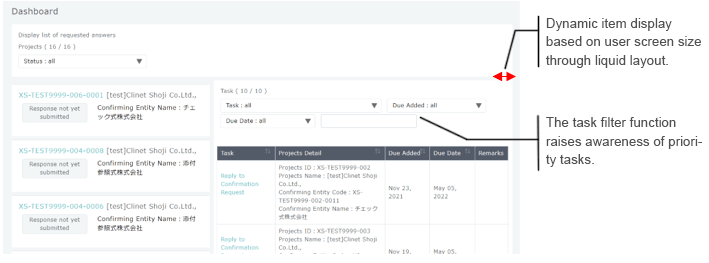
Response screen
Ver. 5
Ver. 6
Header
Ver. 5

Ver. 6

Other added functions and changes
The following functions have been added or changed.
- Files can be uploaded by dragging and dropping on the file upload screen.
- The blank type in project type "Other" has been removed in consideration of its usage situation.
- The difference adjustment screen by confirmation responders in the project type "Credits and debits" has been removed in consideration of its usage situation.
Several other functions have been changed for improved usability.
- Home
- CONTACT INFORMATION
CONTACT INFORMATION
Should you have any questions about the contents of the confirmation request, registration data, attached file(s), etc., please do not hesitate to contact the auditor mentioned in the Initial Authentication Code notification email.
If you have any questions about how to operate Balance Gateway, please contact the following Audit Confirmation center of ACC. Please contact the auditor in charge about the details of operating scheduling during the period of business peak and the consecutive holidays.
Audit Confirmation Center GK
Tel: +81-43-369-4099
(Business hours: 9:30am to 5:30pm JST * Except Saturdays, Sundays, national holidays and our company designated holidays)
Email: support@balancegateway.jp
Address: 261-7119 19F WBG Marive East 2-6-1 Nakase Mihama-ku, Chiba-shi, Chiba, Japan